Let me tell you something. The first time I made these Chocolate Peanut Butter Squares, I put the pan in the fridge and went to watch TV. Forty-five minutes later, I walked back into the kitchen and cut myself a piece before they were even fully set. Worth it, completely worth it. There’s something almost unfair about how good chocolate and peanut butter taste together. It’s one of those flavor combinations that just works, every single time, whether you’re feeding a crowd at a summer potluck, wrapping up treats for a neighbor, or honestly just stress-snacking on a Tuesday afternoon. No judgment here. What makes this recipe stand out from the hundreds of versions floating around online? It skips the powdered sugar and graham cracker crumbs that most old-school recipes rely on. Instead, the base is pure, silky peanut butter and butter, melted low and slow, sweetened just enough, and set with real dark chocolate. The result is a square that’s fudgy, deeply chocolatey, and rich without being cloying. If you love finding Easy Cake Recipes that come together without much fuss, or if you’re always hunting for great Breakfast Ideas that actually feel indulgent, this one belongs in your permanent rotation. And yes, they work as breakfast. Peanut butter, dark chocolate, nuts? That’s basically a protein bar in disguise.
Why This Recipe Beats the Competition in 2026
Most chocolate peanut butter bar recipes you’ll find on big sites follow the same old formula: graham crackers, powdered sugar, and microwave chocolate. That template has been circulating since the early 2000s, and while those bars are fine, they tend to be one-dimensional, sweet, sugary, a bit pasty.
This version is different. Here’s what separates it:
- The base layer is cooked low and slow in a saucepan, which gives it a slightly caramelized depth. The dark chocolate on top gets folded in off the heat so it stays glossy and never turns chalky. The nut topping adds real texture contrast. And because there’s no powdered sugar or flour, the squares are naturally gluten-free and incredibly easy to adapt for dairy-free or keto eating plans.
In 2026, home bakers are leaning hard into no-bake desserts for good reason. Energy costs are up, nobody wants to heat the kitchen in summer, and people genuinely want treats they can prep in under 20 minutes. These no-bake chocolate peanut butter bars check every single one of those boxes.
Tools Required
To prepare the perfect Chocolate Peanut Butter Squares, here’s what you’ll need:
- A medium saucepan for gently melting the peanut butter and butter.
- Mixing bowl + whisk/spatula to combine ingredients smoothly.
- 9×13-inch baking pan yields thin, even squares; use an 8×8-inch pan for thicker pieces.
- Parchment paper for lifting the slab out easily.
- Measuring cups & spoons for accurate ratios.
- Refrigerator Essential for setting the no-bake layers.
Ingredients You’ll Need
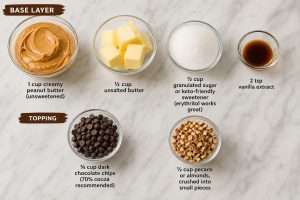
Base Layer
- 1 cup creamy peanut butter (unsweetened)
- ½ cup unsalted butter
- ½ cup granulated sugar or keto-friendly sweetener (erythritol works great)
- 2 tsp vanilla extract
Topping
- ¾ cup dark chocolate chips (70% cocoa recommended)
- ½ cup pecans or almonds, crushed into small pieces
Step-by-Step Instructions
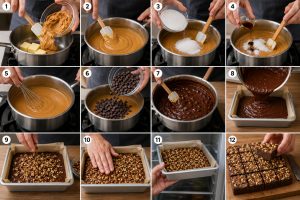
1. Melt the Base
- Add the peanut butter & butter to a medium saucepan over low heat.
- Stir continuously until the mixture becomes smooth and glossy.
- Avoid high heat gentle melting prevents the texture from becoming oily or grainy.
2. Sweeten & Flavor
- Add your sugar or sweetener and vanilla extract to the melted mixture.
- Whisk until fully dissolved. This step only takes 2–3 minutes and ensures a silky finish.
3. Add the Chocolate
- Turn off the heat and stir in the dark chocolate chips.
- The residual heat will melt them into a rich, smooth mixture with no lumps.
4. Layer & Chill
- Line a baking pan with parchment paper.
- Pour the mixture into the pan and spread it evenly with a spatula.
- Sprinkle the crushed nuts generously on top, pressing lightly so they adhere.
- Refrigerate for at least 2 hours or until firm.
5. Slice & Serve
- Use the parchment paper to lift the chilled slab from the pan.
- Cut into 12 large squares or 24 bite-sized pieces.
- Enjoy immediately or store for later!
Chocolate Peanut Butter Squares Recipe
Equipment
Ingredients
- 1 cup peanut butter
- 1/2 cup butter
- 1/2 cup sugar or sweetener of choice
- 2 tsp vanilla essence
- 3/4 cup dark chocolate 70% or semi-sweet
- 1/2 cup pecan or almond pieces (crush pecans with pestle and mortar or quickly blend into small to medium pieces.
Instructions
- Melt the peanut butter and butter in a saucepan over low heat.
- Add the sugar/ sweetener and vanilla to the saucepan and mix well until everything dissolves.
- Add the chocolate chips and mix well
- Pour the mixture into a lined 9x13-inch baking pan and spread evenly.
- Sprinkle the pecan or almond pieces to the square and refrigerate for at least 2 hours or until the chocolate has hardened
- Once the chocolate has hardened, remove the pan from the refrigerator and cut the peanut butter squares into 12 pieces
Notes
Please note that the nutritional information is a rough estimate and can vary significantly based on the products used in the recipe
Nutrition
The Flavor Profile: What to Expect
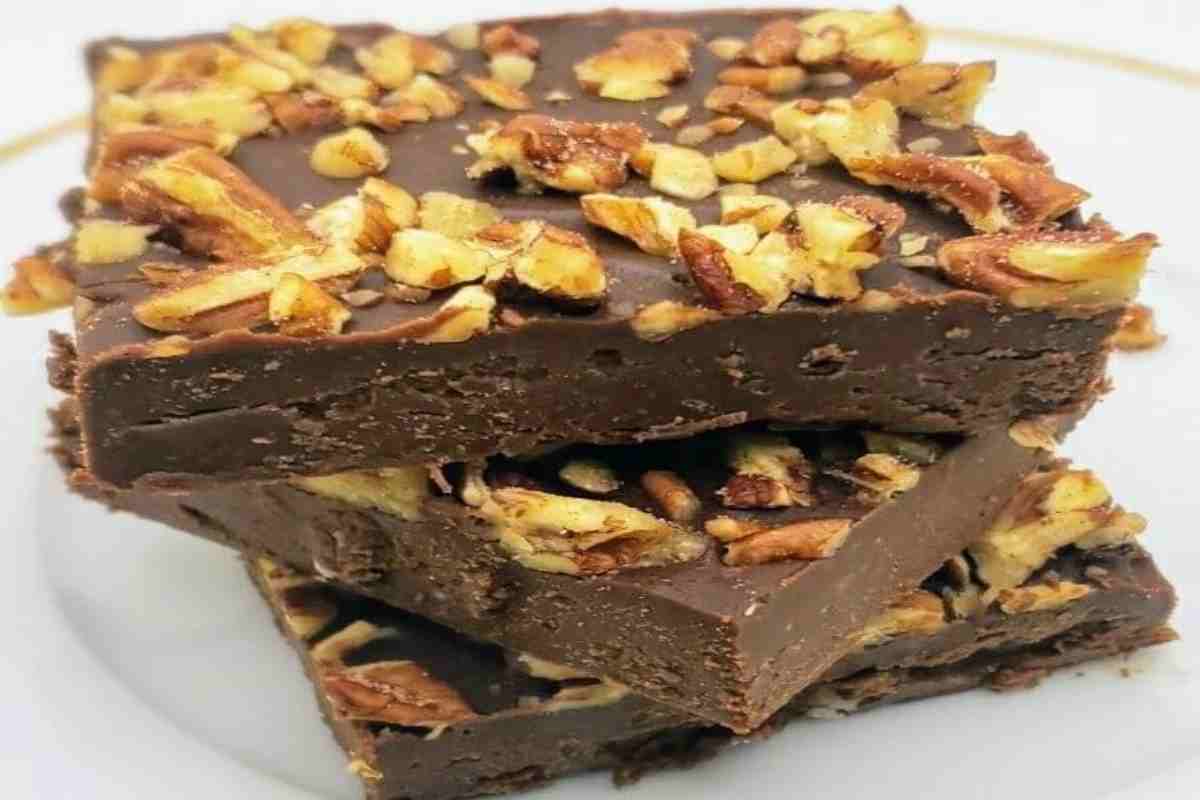
The first bite gives you a clean crack from the set chocolate-nut layer, followed immediately by the creamy, slightly salty peanut butter base. There’s a mild caramel note from the cooked butter-sugar mixture that you just don’t get from a microwave version. The dark chocolate keeps things grounded, not cloyingly sweet, genuinely rich.
It’s the kind of dessert that makes people immediately ask you for the recipe. The kind where someone takes one square and comes back two minutes later for another. The kind you have to put in the back of the fridge so nobody finds it before dessert.
Variations Worth Trying in 2026
The base recipe is near-perfect as written, but here are a few directions people are taking it right now:
Sea Salt Finish:
A pinch of flaky sea salt scattered over the top just before refrigerating changes the whole flavor dynamic. The salt amplifies the chocolate and cuts through the richness of the peanut butter. If you’ve never tried it, do this first.
Almond Butter Swap:
Replace the peanut butter 1:1 with almond butter for a slightly lighter, more subtle flavor. Great for anyone with peanut allergies in the house. You can also blend half peanut butter, half almond butter for something in between.
Coconut Layer:
Stir two tablespoons of toasted shredded coconut into the base before pouring into the pan. It adds a tropical note that sounds odd but works surprisingly well with the dark chocolate.
Double Chocolate:
Fold two tablespoons of unsweetened cocoa powder into the base layer alongside the butter and peanut butter. You end up with a full chocolate-on-chocolate square that’s genuinely dangerous.
Espresso Boost:
One teaspoon of instant espresso powder stirred into the warm chocolate topping deepens the cocoa flavor significantly. This is the version you bring to a dinner party.
Keto-Friendly Version:
Swap the sugar for erythritol or monk fruit sweetener and use 90% dark chocolate for the topping. The recipe works beautifully, and you end up with bars that clock in around 4–5g net carbs per square.
Easy Chocolate Peanut Butter Squares: The Shortcut Version
If you’re genuinely short on time, here’s how to make easy chocolate peanut butter squares in under 15 minutes of active work:
Skip crushing the nuts by hand, just buy pre-chopped pecans or sliced almonds. Use a microwave-safe bowl instead of a saucepan (medium power, 30-second intervals, stir between each). The texture is very slightly less silky but still excellent. Set in the freezer for 45 minutes instead of the fridge for 2 hours if you’re in a real rush.
This shortcut version is the one to bookmark for last-minute gatherings, bake sales, or when the craving hits at 9 pm.
No-Bake Chocolate Peanut Butter Bars: Why No-Bake Wins Right Now
The resurgence of no-bake chocolate peanut butter bars isn’t an accident. In 2026, food trends are moving toward less energy use, more pantry-based cooking, and simpler techniques that produce genuinely impressive results. These bars hit all three.
No preheating the oven, no risk of overbaking or underbaking, no watching the clock. The refrigerator does all the real work. And the final product looks and tastes like something from a specialty dessert shop, which is exactly the kind of thing that does well when shared online. If you’re building out a no-bake dessert collection, pair these squares with something fruity to balance the richness. A batch of Blueberry Muffins on the side turns this into a proper spread.
Chocolate Peanut Butter Squares Recipe: Making It Your Own
The beautiful thing about this chocolate peanut butter squares recipe is how forgiving it is. The base ratio of peanut butter to butter is flexible. The sweetener is completely swappable. The nut topping can be changed out for whatever you have on hand, walnuts, cashews, sunflower seeds, or even crushed pretzels for a salty-sweet variation.
Use it as a template. Once you’ve made it once and understand how the base behaves (it thickens as it cools, so work quickly when pouring into the pan), you can spin it in a dozen directions without ever needing to look at the recipe again.
Nutrition Per Serving
Based on 12 squares per batch, using the original ingredients (creamy peanut butter, unsalted butter, granulated sugar, vanilla, 70% dark chocolate, pecans):
| Nutrient | Per Square |
| Calories | 342 kcal |
| Carbohydrates | 20 g |
| Protein | 6 g |
| Total Fat | 28 g |
| Saturated Fat | 11 g |
| Unsaturated Fat | 15 g |
| Fiber | 3 g |
| Sugar | 14 g |
| Sodium | 164 mg |
| Potassium | 232 mg |
| Calcium | 25 mg |
| Iron | 2 mg |
| Vitamin A | 257 IU |
Note: Nutritional values are estimates and may vary based on specific brands and ingredient substitutions.
Nutritional Benefits Worth Knowing
These squares aren’t just dessert, they bring some real nutritional value to the table.
- Peanut Butter is one of the most protein-dense nut butters available, providing approximately 8 grams of protein per two tablespoons. It’s also a source of healthy monounsaturated fats, magnesium, and vitamin E. The combination of fat and protein in peanut butter creates genuine satiety, meaning you actually feel satisfied after one or two squares rather than wanting to eat the whole pan (in theory).
- Dark Chocolate (70%+) is significantly higher in flavanols, plant-based compounds associated with cardiovascular and cognitive health, than milk chocolate. It’s also lower in sugar, which is one of the reasons 70% cocoa is specifically called for in this recipe.
- Pecans and Almonds contribute healthy fats, vitamin E, and manganese. Pecans in particular are one of the most antioxidant-rich tree nuts available.
- Unsalted Butter allows you to control the total sodium in the recipe. Using unsalted also means the natural sweetness and peanut flavor come through without being masked.
- When you’re looking for a treat that satisfies both the dessert craving and gives you something substantive in return, this recipe earns its place. It pairs well as a post-workout snack, a midday energy hit, or a satisfying finish to any meal.
When to Make These Squares
Summer gatherings:
No-bake means no heated kitchen. These travel well in a cooler and serve straight from cold.
Holiday gifting:
Stack them in a small tin or mason jar with parchment between layers. They keep for a full week refrigerated and three months frozen, so you can batch-make them weeks ahead.
Meal prep:
Make a batch Sunday night, cut into portions, wrap individually, and store in the fridge. They hold up perfectly through the week and beat almost every store-bought snack bar on ingredients and taste.
Potlucks and bake sales:
They’re rich enough that a small square satisfies. One 9×13 pan yields 24 bite-sized pieces, which goes a long way at a crowd event.
Weeknight treat:
15 minutes of active work, 2 hours of waiting. That’s genuinely it.
Serving Suggestions
Serve these squares chilled for the firmest, cleanest bite. If you prefer a softer, more ganache-like texture, let them sit at room temperature for 10 minutes before serving. They pair beautifully alongside peanut butter cookies for a nutty dessert spread. If you’re hosting brunch and want to go all-out on the sweet side, add a moist lemon cake recipe to the table for a bright citrus contrast to the deep chocolate and peanut butter flavors. And if you’re building a dessert board, a show-stopping Pistachio Cake alongside these squares creates a stunning spread with almost no overlap in flavor profile. For something a little lighter to serve on the side, a batch of Blueberry Muffins brings fresh fruit flavor that cuts beautifully through the richness of chocolate and peanut butter. You can also serve it with a cup of coffee and a smoothie like Watermelon Mango Smoothie on Devine Dishes.
Storage Instructions
Refrigerator:
Store in an airtight container, layers separated by parchment paper, for up to 7 days. The texture actually improves slightly after 24 hours as the flavors meld together.
Freezer:
Freeze in a single layer first, then transfer to a zip bag or container for up to 3 months. Thaw in the fridge overnight or at room temperature for 20–30 minutes.
For gifting:
A small dessert box lined with parchment paper with the squares stacked in two layers is all you need. Simple, elegant, and the kind of gift that people actually remember.
Common Mistakes to Avoid
Using high heat:
Everything in this recipe gets melted on low. High heat will cause the peanut butter to seize or the chocolate to turn grainy. Low and slow is the rule here.
Skipping the parchment paper:
This is how you get the slab out of the pan in one clean piece. Do not skip it, and make sure the paper hangs over the sides for easy lifting.
Cutting while too warm:
If the chocolate top is still soft, the squares will smear rather than slice cleanly. Give them the full 2 hours, or a minimum of 1 hour in the freezer.
Using chips labeled “baking chocolate” with additives:
Check the ingredients. You want chocolate chips with cocoa or chocolate liquor as the first ingredient, not sugar. Quality of chocolate here matters more than in most baked goods because it’s the dominant f
Final Thought
These Chocolate Peanut Butter Squares are the kind of recipe that earns permanent space in your kitchen. Not because they’re trendy, but because they work, every single time, for every kind of occasion, with every kind of crowd. The combination of chocolate and peanut butter is one of those genuinely timeless flavor pairings that never needs updating. What we’ve done here is sharpen the technique, deepen the flavor, and strip away the elements that don’t actually improve the recipe. What’s left is a square that’s rich, clean, and honest, and more satisfying than anything you’ll pull from a wrapper at the checkout aisle. Make them once, and you’ll understand why this became a staple. Make them twice, and you’ll start keeping the ingredients on hand all the time.
Also try our drinks that pair well with these Chocolate Peanut Butter Squares:
Refreshing Sugar Free Lemonade
Tropical Smoothie
Avocado Blueberry Smoothie
Frequently Asked Questions (FAQs)
How long do no-bake chocolate peanut butter squares last?
Up to 7 days refrigerated in an airtight container, or 3 months in the freezer.
Can I use natural peanut butter?
Yes, but stir it thoroughly before measuring. Unstirred natural peanut butter can make the base too oily.
Can I make these with natural peanut butter?
Yes, with one condition: make sure it’s fully stirred before measuring. Natural peanut butter separates in the jar, and using the oil-heavy top portion alone will make the base greasy and unstable. Stir thoroughly, measure from the middle of the jar, and you’ll be fine.
Why did my squares turn out too soft?
Two likely causes: either the base wasn’t cooked long enough on the stovetop (you want a glossy, slightly thickened mixture before you add the chocolate) or they didn’t chill long enough. The full 2-hour mark in the fridge is the minimum, overnight is even better.
Can I make these dairy-free?
Absolutely. Swap the unsalted butter for a high-quality vegan butter (Miyoko’s and Earth Balance both work well) and use dairy-free dark chocolate chips. The texture difference is minimal.
Do these work with almond butter instead of peanut butter?
Yes. The texture is almost identical. The flavor is lighter and slightly more neutral, which some people actually prefer. Cashew butter is another excellent option.
What’s the best way to cut them cleanly?
Run your knife under hot water, wipe it dry, cut, repeat. The hot knife melts through the set chocolate without cracking it. Worth the extra 10 seconds per cut.
How do I make these keto or low-carb?
Replace the granulated sugar with erythritol or a monk fruit blend, and swap standard dark chocolate chips for a sugar-free version (Lily’s is widely available). The rest of the recipe stays identical.


