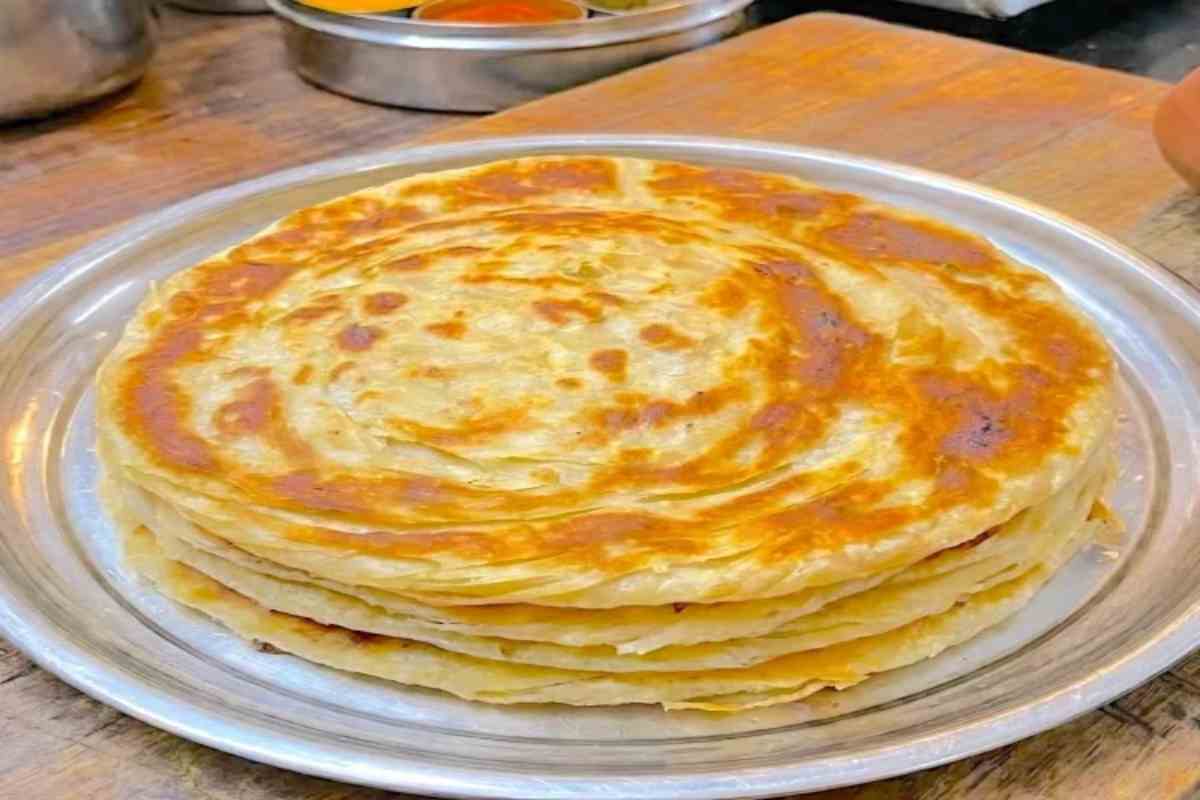
Fluffy Kenyan chapati comes from rolling and folding the dough into layers before cooking it on a hot stovetop pan, which is what gives each piece its signature soft, slightly flaky texture. Unlike a simple flatbread, Kenyan chapati uses a resting and layering technique borrowed from East African kitchens. Hence, it stays soft even after it cools, perfect alongside a cup of chai or as part of your morning spread if you are looking for more Breakfast Ideas. This recipe walks you through the exact dough ratio, resting time, and rolling technique that produce soft, restaurant style chapati at home, using nothing more than a rolling pin and a stovetop pan.
What Is Chapati?
Chapati is an unleavened flatbread made from wheat flour, water, oil and salt, rolled thin and cooked on a dry or lightly oiled pan until it puffs and browns in spots. It originated in the Indian subcontinent and traveled to East Africa through trade and migration, where it was adapted into the layered, slightly richer version now known as Kenyan chapati.
Chapati differs from roti mainly in fat content and technique: roti is typically made with just flour, water and salt and cooked completely dry, while chapati dough includes oil or ghee and is often folded or coiled before rolling, which creates the soft, flaky layers chapati is known for. Naan is a different bread altogether ,it is leavened with yeast or baking powder, traditionally cooked in a tandoor and has a pillowy, bubbled texture that neither roti nor chapati shares.
Kenyan chapati stands apart from its Indian roots through this same layering method, but with a slightly thicker, more substantial result meant to be eaten as a main accompaniment rather than a side. It is commonly paired with stews, beans or vegetables and it uses the same softbread techniques you will find in other East African style flatbreads, like this Soft Shawarma Wrap Bread, which relies on a similar resting and rolling approach to stay pliable.
Kenyan Chapati vs Indian Chapati
The main difference between Kenyan chapati and Indian chapati comes down to fat content and layering technique, Kenyan chapati uses more oil in the dough and is rolled with an extra coiling step that builds thicker, more visible layers, giving it a richer, softer bite than the thinner, lighter Indian version.
In method, Indian chapati is usually rolled once and cooked quickly on a hot tawa, prioritizing speed and a light, everyday texture suited to eating with every meal. Kenyan chapati takes a slower route ,the dough is rolled flat, brushed with oil, then coiled into a spiral and rested again before being rolled out a second time. This doublerolling is what creates the flaky, layered structure Kenyan chapati is known for, rather than the flatter, more uniform texture of its Indian counterpart.
Serving style reflects this difference too. Indian chapati is typically a light side eaten alongside dal, sabzi or curry in small portions throughout a meal, while Kenyan chapati is treated as a heartier main accompaniment, often served in larger pieces alongside beans, stewed meat or vegetables and it is common at breakfast with tea as well as at lunch or dinner. The result is two breads with a shared origin but distinct identities ,one built for everyday lightness, the other for richness and staying power.
The Secret to the Two Stage Frying Method
Most people make the mistake of adding oil to the pan the second the raw chapati hits the surface. This seals the exterior too quickly and can leave the internal layers dense. This recipe utilizes a professional two-stage cooking method:
- The Dry Sear: You place the rolled circle onto a dry, medium-high pan first. As the trapped moisture inside hits the heat, it instantly turns to steam, forcing the layers to puff up and separate naturally.
- The Oil Finish: Once all your chapatis have been dry-cooked and set, you bring them back to the pan one by one with a tablespoon of oil to shallow-fry them to a crisp, golden-brown perfection. This keeps the inside incredibly soft while ensuring a beautiful, flaky exterior.
Making the Delicious Fluffy Kenyan Chapati
Yields: 12–15 large chapatis Prep time: 20 minutes Cook time: 30 minutes
Ingredients
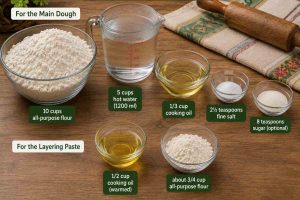
For the Main Dough
- 10 cups all-purpose flour Gives you a substantial batch of large, hearty chapatis.
- 5 cups hot water (1200 ml) Should be hot to the touch (around 50°C to 60°C). This is crucial for pre-gelatinizing the starches to yield an ultra-soft crumb.
- 1/3 cup cooking oil Integrated directly into the dough base for internal elasticity and richness.
- 2½ teaspoons fine salt Tightens the dough structure and provides essential savory balance.
- 8 teaspoons sugar (optional) Highly recommended for that authentic, subtly sweet flavor profile and to aid in gorgeous golden browning.
For the Layering Paste
- 1/2 cup cooking oil: Warmed up to easily combine with the flour.
- About 3/4 cup all-purpose flour: Whisked into the warm oil to create a smooth, paintable paste.
Can You Use All Purpose Flour Instead of Chapati Flour?
Yes, all purpose flour can substitute for chapati flour, though the texture will be slightly less elastic and the chapati may be a touch denser. For the closest result, mix all purpose flour with a small amount of whole wheat flour (about a 3:1 ratio) to restore some of the elasticity and nutty flavor that pure chapati flour provides.
How to Make the Dough
To make Kenyan chapati dough, mix the flour and salted warm water first, then knead in the oil gradually until the dough turns soft and stretchy, typically requiring around 8 to 10 minutes of kneading by hand. The dough should have a soft texture that feels a bit tacky, but it shouldn’t be sticky enough to cling to your fingers.
Kneading technique matters as much as the ingredients themselves. Press and fold the dough with the heel of your hand, rotating it a quarter turn between folds, rather than just squeezing it into a ball. This builds gluten structure evenly throughout the dough, which is what allows it to stretch thin later without tearing or springing back.
If the dough feels stiff after a few minutes, wet your hands slightly and continue kneading rather than adding more water directly, since too much water at once makes the dough difficult to control. The same gentle, gradual kneading approach applies to other soft doughs, including these Dinner Rolls, where controlled hydration is equally important for a tender crumb.
Once kneaded, divide the dough into equal balls, cover them with a moist cloth or plastic wrap and let them rest before rolling.
Why Resting the Dough Matters for Fluffiness
Resting the dough lets the gluten to relax after kneading, which makes it far easier to roll thin without shrinking back or tearing. Skipping this step is one of the most common reasons chapati turns out tough or chewy instead of soft and fluffy, so a minimum rest of 20 to 30 minutes at room temperature is worth the wait.
Step by Step Masterclass Instructions
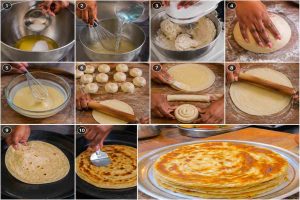
- Step 1 Attach the dough hook to your stand mixer. Add the salt, sugar (if using), and 1/3 cup of cooking oil directly into the bottom of the mixer bowl.
- Step 2 Slowly pour the 5 cups (1200 ml) of hot water into the bowl. Give it a quick whisk by hand or a brief turn of the mixer to ensure the salt and sugar are completely mix it in the liquid before adding the flour.
- Step 3 Set your mixer to low speed. Add your 10 cups of all-purpose flour in two separate batches. Let the first batch incorporate slightly before adding the rest. Run the stand mixer on low-medium speed for 5 to 7 minutes until the flour completely hydrates and pulls away cleanly from the sides of the bowl, forming a unified, soft dough.
- Step 4 Transfer the dough out of the mixer onto a lightly floured work surface. Give it a quick, light manual knead for 1 to 2 minutes just until it transforms into a perfectly smooth, cohesive ball. It should feel incredibly soft and pliable.
- Step 5 In a small separate bowl, heat your 1/2 cup of layering oil until it is hot but not smoking. Slowly stir in the 3/4 cup of flour, whisking continuously until it forms a perfectly smooth, pourable paste with no lumps. This is your secret weapon for distinct separation.
- Step 6 Divide your large dough mass into 12 to 15 equal pieces. Gently roll each portion in your hands to shape smooth, compact dough balls.Take one ball at a time and use a rolling pin to roll it out into a thin, even circle on your floured surface.
- Step 7 Take a spoon or a pastry brush and spread a thin, even layer of your prepared oil-flour paste across the entire surface of the rolled circle. Starting from one edge, roll the circle tightly into a long rope, then coil that rope around itself like a snail shell, tucking the loose end underneath. Repeat this process for all your dough balls and let them rest for 5 minutes.
- Step 8 Take your coiled dough shells and, using your rolling pin, roll them out a second time into neat, even circles (about 1/8 inch thick). Be careful not to press down with extreme force, as you want to preserve the internal coiled structures you just created.
- Step 9 Heat a heavy, dry skillet or tawa over medium-high heat. Place a rolled chapati onto the hot pan without adding any oil. Cook for 1 to 2 minutes until you see beautiful air bubbles beginning to puff up across the surface. Flip the chapati and cook the other side briefly for another 30 to 45 seconds, then remove it from the pan. Repeat this dry-cooking process for the entire batch, stacking them together under a clean kitchen towel to trap the steam.
- Step 10 Once all chapatis have been dry-cooked, return the first chapati back to the hot pan. Pour about 1 tablespoon of cooking oil around and on top of it. Use a spatula to press down gently on the edges, rotating it continuously. Flip it over and brown the other side. Cook until the exterior is stunningly crispy, flaky, and speckled with deep golden-brown spots. Remove, stack in an insulated container, and serve warm!
Stovetop Tawa/Cast Iron Method
Heat a tawa or cast iron pan over medium high heat until it’s hot but not smoking, then place the rolled chapati on the dry pan. Heat for approximately 30 to 45 seconds until small bubbles start to form, flip it and brush the top lightly with oil. Flip again and press gently with a folded cloth or spatula around the edges ,this encourages even puffing and ensures the layers cook through without burning. Each chapati typically takes 2 to 3 minutes total and it’s done when both sides have golden brown spots and the bread feels soft, not stiff, when pressed.
Fluffy Kenyan Chapati Recipe
Ingredients
For the main dough
- 10 cups all-purpose flour plus extra for dusting
- 2.5 tsp fine salt
- 8 tsp granulated sugar optional but recommended
- 5 cups water hot
- 1/2 cup cooking oil vegetable or canola
For the Layering & Frying
- 1/2 cup cooking oil warmed
- 3/4 cup all-purpose flour for paste
- cooking oil extra for shallow frying (approx. 1 tbsp per chapati)
Instructions
- In your stand mixer bowl fitted with a dough hook, add the salt, sugar, 1/3 cup cooking oil, and pour in the 5 cups of hot water. Stir briefly to dissolve.
- Turn the mixer on low speed and add the 10 cups of all-purpose flour in two large batches, letting it knead for 5–7 minutes until a soft, unified dough forms.
- Transfer to a lightly floured countertop and knead manually for 1-2 minutes until completely smooth and pliable.
- In a small bowl, whisk together the 1/2 cup of warmed oil and 3/4 cup of flour until it forms a completely smooth, pourable paste.
- Divide the dough into 12 to 15 equal portions and roll them into tight balls. Roll each ball out into a thin circle using a rolling pin.
- Spread a thin layer of the oil-flour paste across the circle. Roll the dough up tightly into a rope, then coil it into a snail-shell shape. Let rest for 5 minutes.
- Roll each coiled piece out a second time into an even circle about 1/8 inch thick.
- Heat a dry pan over medium-high heat. Place the chapati on the pan without oil and cook for 1-2 minutes until bubbles form, flip for 30 seconds, then remove. Repeat for all pieces.
- Return each pre-cooked chapati to the hot pan one at a time, add 1 tablespoon of oil, and shallow fry both sides until flaky, crispy, and beautifully golden-brown. Serve warm.
Notes
Nutrition
Tips for Extra Soft and Flaky Layers
Keep the pan at a steady medium high heat rather than cranking it up, since too much heat cooks the outside before the layers inside have a chance to steam and separate properly. Stack cooked chapati in a clean kitchen towels as they are taken off the pan, the steam that is trapped helps to retain their moisture, keep them soft and helps the layers relax further. Rolling too thin or skipping the second rest are the two most common reasons chapati turns out flat instead of flaky, so patience through both resting stages pays off in texture.
How to Keep Chapati Soft After Cooking
The best way to keep chapati soft after cooking is to stack it in a clean kitchen towel or covered container while still warm, since the trapped steam prevents the surface from drying out and stiffening as it cools. For longer storage, let the chapati cool completely first, then layer it between sheets of wrap paper then keep it in an airtight container or resealable bag.
At room temperature, chapati stays soft for about a day if kept covered. In the fridge, it holds well for up to 4 to 5 days and it freezes cleanly for up to 2 months when stacked, use parchment paper between every piece to avoid them sticking together. This makes it easy to prep a batch ahead and pair it with something like healthy breakfast ideas for weight loss for a quick, balanced morning meal without extra cooking.
To reheat, a dry skillet over medium heat for about 20 to 30 seconds per side brings chapati closest to fresh, restoring both softness and light char without drying it out. A microwave works in a pinch ,wrap the chapati in a damp paper towel and heat for 15 to 20 seconds, which uses steam to soften it back up.
An air fryer also reheats chapati well: 2 to 3 minutes at 300°F, wrapped loosely in foil, warms it through while keeping the edges from turning brittle. Whichever method you use, avoid reheating directly on high heat without moisture, since that’s what usually turns leftover chapati hard and dry.
Nutrition Facts Per Chapati
| Nutrient | Amount |
|---|---|
| Calories | 141 kcal |
| Protein | 4 g |
| Carbohydrates | 21.6 g |
| Fiber | 3.2 g |
| Total Fat | 5.1 g |
| Sodium | 288 mg |
Values are calculated from the recipe whole wheat flour, oil, salt and water quantities, divided across 8 chapatis. Actual numbers will vary slightly with flour brand and oil quantity used.
Benefits of Chapati
Chapati offers a solid mix of complex carbohydrates and fiber when made with whole wheat flour, since the bran retained in whole wheat slows digestion and helps keep blood sugar more stable than refined flour breads. This makes it a more balanced choice than white bread or naan for anyone watching energy levels or blood sugar spikes.
Because chapati is unleavened and cooked without deep frying, it’s naturally lower in added fat than many other flatbreads, and the oil content is easy to control since it’s added directly during preparation rather than absorbed through frying. The fiber from whole wheat flour also supports digestion and helps with satiety, meaning chapati can help you feel fuller for longer compared to more refined starches.
Chapati is also versatile enough to fit into different dietary patterns, it pairs well with protein rich curries and stews, making it easy to build a more complete meal, and portion size is simple to manage since each piece is a defined serving rather than a large loaf you might overeat from.
What to Serve with Kenyan Chapati
Kenyan chapati pairs best with saucy, wellspiced dishes that its soft layers can scoop up, making it a natural match for bean stews, lentil curries and braised meats. It’s also common at breakfast alongside eggs or tea, since its mild flavor works with both savory and lightly sweet spreads.
For dinner or lunch, chapati is traditionally served with dishes like beef or goat stew, sukuma wiki (sautéed greens) or a coconutbased curry, where the bread is torn and used to scoop up sauce rather than eaten plain. A dish like Creamy Coconut Chicken works especially well here, since its rich sauce clings to the soft layers of chapati the same way traditional Kenyan curries do.
At breakfast, chapati is often served alongside chai (spiced tea with milk) or coffee, sometimes with a simple side of eggs. If you want to build out a fuller morning spread, pairing chapati with something like a Loaded Breakfast Omelette turns it into a heartier, protein rich meal rather than a light side. However you serve it, chapati’s role is less about standing alone and more about complementing whatever sauce, stew or filling it’s paired with.
For an afternoon treat, enjoy them plain with a thin spread of natural honey or alongside ripe yellow bananas.
Your Baking Journey Matters
We are absolutely thrilled to share these large batch flatbread secrets with you, and there is nothing better than seeing those beautiful layers come to life in your own kitchen! Did your stand mixer handle the batch like a breeze, and did you get those perfect pull apart layers using the oil-flour paste? Please take a quick moment to leave a rating and share your experiences, tips or adjustments in the comments section below, we love hearing your feedback!
Also try our other delicious recipes:
Creamy Honey Chicken
Fluffy Keto Bagels
Baked Turkey Wings
Chicken Roast Recipe
Frequently Asked Questions (FAQs)
What is chapati made of?
Chapati is made from wheat flour, water, oil and salt, kneaded into a soft dough and rolled thin before cooking on a dry or lightly oiled pan. Kenyan versions typically use a bit more oil and a coiling technique to build soft, flaky layers.
Is chapati healthy?
Chapati made with whole wheat flour and moderate oil is a reasonably balanced source of carbohydrates, fiber and some protein, making it fine as part of a varied diet. It’s not inherently unhealthy, but portion size and the amount of oil used during cooking make the biggest difference.
Is chapati the same as roti?
No, chapati and roti are related but not identical. Roti is usually made with just flour, water and salt and cooked completely dry, while chapati dough includes oil and is often layered, giving it a softer, richer texture than roti.
Why is my chapati hard instead of soft?
Chapati usually turns hard from overkneading without enough resting time, rolling the dough too thin or cooking it on heat that’s too high, which dries out the layers before they can steam and soften. Skipping the resting stages is the most common culprit, so give the dough at least 2030 minutes to relax before rolling.


2 Comments. Leave new
Tried this recipe today and the two-stage cooking method (dry sear then oil finish) made all the difference such soft, flaky layers! The oil-flour paste trick is genius. Definitely making this again. 😊
I tried this Kenyan chapati recipe and was genuinely impressed with the results. The instructions were easy to follow, and the tips on kneading, resting the dough, and creating flaky layers made a noticeable difference. The chapatis turned out soft, fluffy, and beautifully golden with just the right amount of chew. They paired perfectly with stew and stayed tender even after cooling. This is definitely a recipe I’ll be making again and would recommend to anyone looking for authentic homemade Kenyan chapatis.