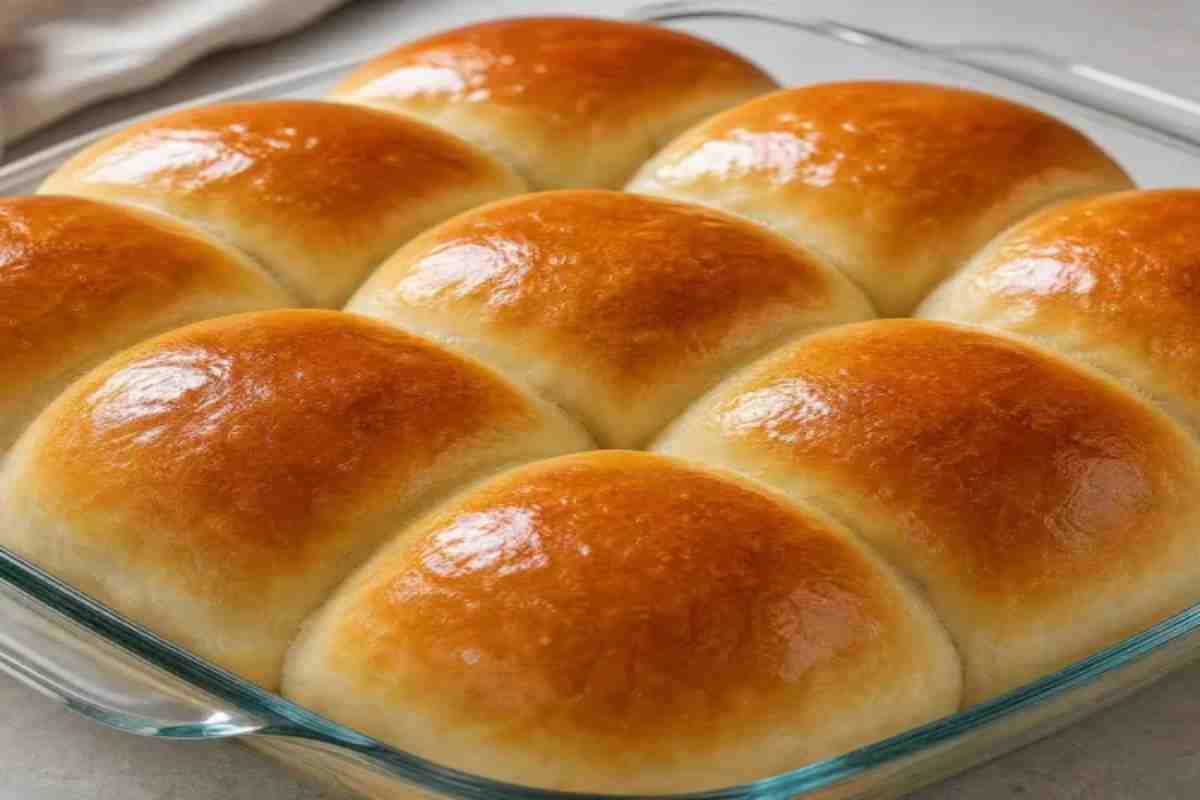
This dinner rolls recipe gives you impossibly soft, lightly sweet, golden rolls straight from the oven, made entirely in one bowl with simple pantry ingredients. If you have ever pulled a tray of pillowy rolls from the oven and watched them disappear before the main course even hits the table, you already know what homemade dinner rolls do to a room. This recipe delivers exactly that, a classic American style oven baked dinner roll with a tender crumb, a whisper of sweetness, and a buttery, golden top that makes it impossible to stop at one.
What sets this recipe apart is the one bowl method. No complicated steps, no professional equipment, no stress. You mix everything together, let the yeast do its quiet, reliable work, shape the rolls and slide them into the oven. The result is a batch of soft, fluffy dinner rolls that taste like they took all day but actually come together in under two hours, from bowl to table. These are American style rolls in the truest sense, enriched with butter and a touch of sugar, baked in the oven until the tops turn a warm, even golden brown and finished with a brush of melted butter while still hot.
The oven is what makes the difference here, it creates that signature soft interior and slightly crisp outer layer that air fryer or pan methods simply cannot replicate in the same way. If you are looking for a recipe that works every single time, this is it. Whether you are making these for a weeknight family dinner, a holiday spread, or just because fresh bread makes everything better, this recipe belongs in your permanent rotation. And if you love starting the day with homemade bakes, our breakfast recipes are the perfect place to explore next.
What Makes These the Best Homemade Dinner Rolls?
These are the best homemade dinner rolls because they combine a foolproof one bowl method with the right balance of enriched dough ingredients, producing rolls that are consistently soft, fluffy and golden every single time you make them. Most dinner roll recipes either require a stand mixer, multiple bowls, or a long list of steps that feel unnecessarily complicated for what should be a simple, comforting bake.
This recipe strips all of that away. The dough comes together in a single bowl, the ingredients are straightforward and the process is forgiving enough for first time bread bakers while still producing results that impress experienced home cooks. If you enjoy baking from scratch, our full collection of Homemade Bread recipes is worth bookmarking for your next bake.
Why This One Bowl Method Beats All Others
The one bowl method works because it reduces unnecessary handling of the dough and eliminates the washing up that discourages people from baking bread in the first place. Everything, the warm liquid, the yeast, the fat, the flour, goes into a single bowl in the right order and the dough develops structure through proper kneading rather than through complicated multi stage mixing. Fewer steps means fewer points of failure, which is exactly why this method consistently produces soft, even rolls with a tender crumb and no dense or gummy patches.
The Secret to Extra Soft and Fluffy Dinner Rolls Every Time
The secret lies in three things working together, fat, sugar and proper proofing. Butter enriches the dough and coats the gluten strands, keeping the crumb tender rather than chewy. A small amount of sugar feeds the yeast and contributes to that signature light sweetness, while also helping the rolls brown evenly in the oven.
Proper proofing, giving the dough enough time to double in size before shaping and again after shaping before baking, is what creates that airy, pillowy interior. Rushing either rise is the single most common reason homemade rolls turn out dense. Give the dough the time it needs and the oven takes care of the rest.
What Kind of Yeast Works Best Active Dry vs Instant Yeast
Both active dry yeast and instant yeast work well in this dinner roll recipe, but they behave slightly differently. Active dry yeast requires dissolving in warm liquid first, a step called proofing, which takes about five to ten minutes and gives you a chance to confirm the yeast is alive and active before committing it to your dough.
Instant yeast, sometimes labelled as rapid rise or fast acting yeast, can be added instantly to the dry ingredients without proofing and it typically shortens the rise time by fifteen to twenty minutes. For this recipe, either works. If you want the most reliable result with the least guesswork, instant yeast is the easier choice. If you prefer a slightly more developed flavour and are not in a hurry, active dry yeast gives the dough a little more time to build complexity.
Recipe Time
| Detail | Time |
| Prep Time | 20 minutes |
| First Rise | 60 minutes |
| Second Rise | 30–45 minutes |
| Bake Time (Oven) | 18–22 minutes |
| Bake Time (Air Fryer) | 10–14 minutes |
| Total Time (Oven) | 1 hour 40 minutes |
| Total Time (Air Fryer) | 1 hour 30 minutes |
Ingredients
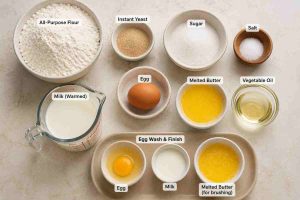
For the Dough
- 3¼ cups all purpose flour with a bit more for dusting
- 2¼ teaspoons instant yeast
- ¼ cup sugar
- 1 teaspoon salt
- 1 cup milk, warmed to about 43°C
- 1 room temperature egg
- ¼ cup butter, melted
- 2 tablespoons vegetable oil
For the Egg Wash and Finish
- 1 egg
- 1 tbsp milk
- 1–2 tbsp melted butter for brushing immediately post bake
Step by Step Instructions
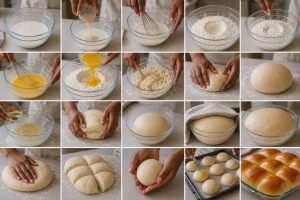
- Activate the Yeast In a spacious bowl, combine the warm milk, sugar, and instant yeast using a whisk. Let the mixture sit without stirring for 5 to 10 minutes, or until it develops a frothy and foamy layer on top, indicating that the yeast is active and working.
- Combine the Liquids Whisk the egg, melted butter, vegetable oil, and salt directly into the yeast mixture until fully incorporated.
- Build the Dough Gradually add the all purpose flour to the liquid base. Mix utilising a wooden spoon or a dough hook until a soft, uniform dough begins to form.
- The Knead Turn the dough onto a lightly floured surface. Knead continuously for 8–10 minutes until the surface is smooth and elastic. The dough should feel incredibly soft and slightly sticky to the touch. Avoid adding too much raw flour here, as a stiff dough leads to heavy rolls.
- The First Rise Place the dough in a lightly greased bowl, cover with a damp cloth or plastic wrap, and let it rise in a cozy, draft free area for approximately 1 hour, or until it has completely doubled in size.
- Shape the Rolls Gently deflate the risen dough. Split it into 9 to 12 equal pieces, then roll each into a smooth ball. Place the shaped dough balls side by side in a greased and floured baking pan.
- Egg Wash and Second Rise In a small bowl, combine the leftover egg with 1 tablespoon of milk and whisk them together. Lightly apply this egg wash to the tops of the rolls. Then, cover the pan loosely and allow the rolls to rise again for 30 to 45 minutes, or until they have puffed up and are in contact with each other.
- The Bake Two Ways
- Oven Method: Bake at 180°C (350°F) for 18–22 minutes until deep golden brown. If the tops are browning too fast, cover the pan with aluminum foil.
- Air Fryer Method: Place the rolls in a lined air fryer basket and bake at 160°C (320°F) for 10–14 minutes until golden and cooked through.
- The Finisher The absolute second the rolls come out of the heat, brush the tops generously with melted butter. This seals in the moisture and keeps the crust incredibly soft.
How to Know When the Dough Has Proofed Correctly
The dough has proofed correctly when it has doubled in size and feels light, slightly puffy and airy to the touch. The most reliable way to test this is the poke test flour one finger lightly and press it about one centimetre into the dough. If the indent springs back slowly and only partially fills in, the dough is ready. If it springs back immediately, the dough needs more time. If the indent stays completely without springing back at all, the dough has overproofed and the rolls may turn out flat or slightly dense.
Room temperature matters here, a warm kitchen speeds up the proof, while a cool kitchen slows it down. If your kitchen is cold, place the covered bowl in a switched off oven with just the oven light on to create a gentle, consistent warmth. The same test applies after the second proof, once the rolls have been shaped and placed in the baking tin. They should look visibly puffed, feel soft when gently pressed and have expanded to the point where they are just touching each other. That contact between rolls during baking is what gives them their characteristic soft, pull apart sides.
Oven Temperature and Baking Time for Perfect Dinner Rolls
The ideal oven temperature for soft and fluffy dinner rolls is 180°C to 190°C (350°F to 375°F) on a conventional oven setting, or 170°C (340°F) on fan assisted. This temperature range bakes the rolls through evenly without rushing the crust, which means the inside stays tender and fully cooked while the outside develops a light, even golden colour rather than a hard or dark crust.
At this temperature, a standard batch of twelve rolls will take between eighteen and twenty two minutes, depending on your oven and the size of your rolls. Start checking at the eighteen minute mark. The rolls are done when the tops are a warm golden brown and the internal temperature reads between 88°C and 93°C (190°F to 200°F) on a kitchen thermometer. If you do not have a thermometer, tap the base of a roll, it should look open. Avoid opening the oven door in the first fifteen minutes, as the sudden drop in temperature can interrupt the final oven spring and leave you with slightly flat tops.
How to Get a Golden, Buttery Top on Your Rolls
The key to that signature golden, buttery top is a two step finishing process an egg wash before baking and a butter brush immediately after. Before the rolls go into the oven, brush the tops lightly with a whisked egg mixed with a tablespoon of milk. This creates a thin, even coating that turns deep golden in the oven and gives the surface a gentle sheen without making it greasy or heavy.
The moment the rolls come out of the oven, while they are still hot, brush the tops generously with melted unsalted butter. The heat from the rolls absorbs the butter instantly, softening the top crust, adding richness and giving each roll that irresistible glossy finish. This step is what separates a good dinner roll from a truly memorable one. Do not skip it and do not wait for the rolls to cool first, the butter needs to go on while the rolls are at their hottest.
Soft Dinner Rolls Recipe That Stays Fluffy for Days
Ingredients
- 3¼ cups all purpose flour (with a bit more for dusting)
- 2¼ teaspoons instant yeast
- ¼ cup sugar
- 1 teaspoon salt
- 1 cup milk warmed to about 43°C
- 1 room temperature egg
- ¼ cup butter melted
- 2 tablespoons vegetable oil
For the Egg Wash & Finish:
- 1 egg
- 1 tbsp milk
- 1–2 tbsp melted butter (for brushing immediately post-bake)
Instructions
Step-by-Step Instructions
- Activate the Yeast In a spacious bowl, combine the warm milk, sugar, and instant yeast using a whisk. Let the mixture sit without stirring for 5 to 10 minutes, or until it develops a frothy and foamy layer on top, indicating that the yeast is active and working.
- Combine the Liquids Whisk the egg, melted butter, vegetable oil, and salt directly into the yeast mixture until fully incorporated.
- Build the Dough Gradually add the all-purpose flour to the liquid base. Mix utilising a wooden spoon or a dough hook until a soft, uniform dough begins to form.
- The Knead Turn the dough onto a lightly floured surface. Knead continuously for 8–10 minutes until the surface is smooth and elastic. The dough should feel incredibly soft and slightly sticky to the touch. Avoid adding too much raw flour here, as a stiff dough leads to heavy rolls.
- The First Rise Place the dough in a lightly greased bowl, cover with a damp cloth or plastic wrap, and let it rise in a cozy, draft-free area for approximately 1 hour, or until it has completely doubled in size.
- Shape the Rolls Gently deflate the risen dough. Split it into 9 to 12 equal pieces, then roll each into a smooth ball. Place the shaped dough balls side by side in a greased and floured baking pan.
- Egg Wash and Second Rise In a small bowl, combine the leftover egg with 1 tablespoon of milk and whisk them together. Lightly apply this egg wash to the tops of the rolls. Then, cover the pan loosely and allow the rolls to rise again for 30 to 45 minutes, or until they have puffed up and are in contact with each other
- The Bake (Two Ways)Oven Method Bake at 180°C (350°F) for 18–22 minutes until deep golden brown. If the tops are browning too fast, gently cover the pan with a piece of aluminum foil.Air Fryer Method Place the rolls in a lined air fryer basket and bake at 160°C (320°F) for 10–14 minutes until golden and cooked through.
- The Finisher The absolute second the rolls come out of the heat, brush the tops generously with melted butter. This seals in the moisture and keeps the crust incredibly soft.
Notes
Nutrition
Servings
| Detail | Quantity |
| Servings | 9–12 rolls |
| Serving Size | 1 roll |
Nutrition Per Serving
| Nutrient | Per Roll Approximately |
| Calories | 215 kcal |
| Carbohydrates | 32 g |
| Protein | 5 g |
| Total Fat | 7.5 g |
| Saturated Fat | 3.5 g |
| Cholesterol | 42 mg |
| Sodium | 230 mg |
| Fiber | 1 g |
| Sugar | 5 g |
| Calcium | 50 mg |
| Iron | 1.8 mg |
Nutritional values are estimates based on standard ingredients and will vary with substitutions.
Tips for Soft, Fluffy and Moist Dinner Rolls Every Time
Soft, fluffy, moist dinner rolls come down to a handful of technique details that most recipes never explain. Get these right and you will never pull a dense or dry roll from the oven again. The difference between a dinner roll that is forgettable and one that makes people reach for a second before they have finished their first is seldom about the ingredients list.
It is about what happens during mixing, proofing, baking and the thirty seconds immediately after the tray comes out of the oven. These tips apply whether you are making this recipe for the first time or troubleshooting a batch that did not turn out quite the way you expected. For more ideas on what to serve these rolls alongside, browse our full collection of Dinner Recipes for inspiration.
Why Your Rolls Might Be Coming Out Dense and How to Fix It
Dense dinner rolls are almost always caused by one of four things under proofed dough, too much flour, liquid that was too hot and killed the yeast, or yeast that was past its prime before you even started.
Under proofing is the most common culprit. If the dough has not had enough time to fully double in size during either the first or second rise, the gluten structure is not developed enough to trap the gas the yeast produces and the rolls bake up tight and heavy instead of light and airy. The fix is simply patience, do not rush. Either rise and use the poke test described in the step by step section to confirm the dough is genuinely ready before moving forward.
Too much flour is the second most frequent problem and it usually happens gradually as people add extra flour to manage sticky dough. A slightly tacky dough is normal and correct. The moment the dough becomes stiff and easy to handle without sticking at all, you have likely added too much. Weigh your flour if possible, or spoon it into the measuring cup and level it off rather than scooping directly from the bag, which compacts the flour and consistently adds ten to twenty percent more than the recipe intends.
Liquid temperature is critical when working with yeast. Water or milk that is too hot, above 43°C (110°F), kills the yeast before it has a chance to activate. Too cold and the yeast stays dormant and sluggish. Aim for the temperature of a warm bath, comfortable on the inside of your wrist and your yeast will activate reliably every time.
Finally, always check the expiry date on your yeast. Old or improperly stored yeast produces weak results, no matter how carefully you follow the recipe. If you are unsure, proof the yeast in warm water with a pinch of sugar for ten minutes before using it, it should foam actively. If it does not, replace it.
How to Avoid Overbaking
Overbaking is the primary reason homemade dinner rolls turn out dry and it happens more easily than most people expect because the window between perfectly baked and overbaked is only two to three minutes at the correct oven temperature. The most reliable way to avoid overbaking is to start checking the rolls two to three minutes before the recipe stated baking time ends.
The rolls are ready when the tops are a warm, even golden brown, not deep brown, not pale yellow, but the colour of toasted honey. If you have a kitchen thermometer, the internal temperature should read between 88°C and 93°C (190°F to 200°F). Pull them at the lower end of that range rather than the higher end, because the rolls continue to cook slightly from residual heat even after leaving the oven.
Another thing to watch is the bottom of the rolls. If the base is turning dark before the tops have coloured properly, your oven runs hot on the bottom element. Place the baking tin on a higher rack or slide an empty baking sheet underneath it to diffuse the heat. Every oven behaves slightly differently, so the first time you make this recipe in a new oven, treat the stated baking time as a guide rather than a rule and trust your eyes and thermometer over the clock.
The Butter Brush Technique for Ultra Soft Tops
Brushing the rolls with melted butter the moment they come out of the oven is the single most effective technique for achieving ultra soft, glossy tops and it costs almost no effort. The science behind it is simple. Hot rolls fresh from the oven have a surface that is still slightly porous and actively releasing steam. When melted butter hits that surface immediately, it penetrates the crust before it has a chance to set and harden, keeping it pliable, tender and rich rather than dry or chewy. The same butter applied five minutes later, once the crust has firmed up, sits on top rather than soaking in and the result is noticeably less soft.
Use unsalted butter, so you control the seasoning and melt it fully so it spreads easily without dragging or tearing the surface of the rolls. A pastry brush gives the most even coverage, but even a piece of folded kitchen paper dipped in melted butter works well. Be generous, this is not the moment to be cautious. The butter is finishing the roll, not just decorating it and a light hand here is the difference between rolls that are merely good and rolls that are genuinely outstanding.
Health Benefits Worth Knowing
These rolls are not just delicious, they bring some real nutritional value to the table, especially when made from scratch at home versus buying packaged alternatives.
- Eggs provide complete protein and B vitamins, supporting energy metabolism and muscle repair.
- Whole milk adds calcium and phosphorus, both important for bone density.
- Butter in moderation delivers fat soluble vitamins A, D, E, and K. And because you’re making these yourself, there are zero preservatives, artificial flavors, or mystery additives, unlike the grocery store version that stays fresh for two weeks on a shelf.
- Homemade rolls also give you full control over sodium and sugar levels. Cutting the sugar by half or switching to a lower sodium butter would not drastically change the texture, but would bring the numbers down meaningfully.
Easy Variations to Try
This dinner rolls recipe is incredibly versatile, the same base dough takes on completely different characters depending on what you add to it, making it easy to customise for any occasion or flavour preference. Once you have mastered the original soft, sweet dinner rolls, these variations are a natural next step. Each one uses the same one bowl, oven baked method, so there is no new technique to learn, just a few ingredient swaps or additions that completely transform the result.
All variations below are baked in the oven using the Continental and American style of enriched bread baking, which delivers the best rise, the most even crumb and that signature pull apart softness that other cooking methods cannot quite match. While air fryer dinner rolls are possible and work reasonably well for reheating or small batches, the oven remains the superior method for achieving maximum lift, an even golden top and the full texture the dough is capable of producing.
Garlic Butter Dinner Rolls Oven Method
Garlic butter dinner rolls are the savoury counterpart to the original sweet version and they work beautifully alongside pasta, soups, or any dish that benefits from something rich and aromatic on the side. To make these, prepare the base dough exactly as written and add two to three cloves of finely minced garlic or half a teaspoon of garlic powder for a more subtle, evenly distributed flavour, directly into the dough during mixing.
For the finishing butter, melt two tablespoons of unsalted butter with one additional clove of crushed garlic and a small handful of finely chopped fresh parsley, then brush this generously over the rolls the moment they come out of the oven. The garlic softens in the heat and the parsley adds a fresh, slightly herby note that balances the richness of the butter. These rolls are best served warm and disappear fast, so consider doubling the batch if you are feeding a crowd.
Honey Butter Sweet Dinner Rolls
Honey butter dinner rolls take the natural sweetness of the base recipe and deepen it with floral warmth, making them a perfect match for holiday tables, brunch spreads, or served simply with a cup of tea. The adjustment is minimal but impactful replace the sugar in the dough with an equal measure of good quality honey and add an extra tablespoon on top of what the recipe calls for to intensify the flavour.
Honey also adds moisture to the dough, so the rolls bake up slightly softer and stay fresh a little longer than the standard version. For the finishing brush, mix one tablespoon of honey into the melted butter before applying it to the hot rolls straight from the oven. The honey caramelises very slightly against the warm surface and creates a glaze that is glossy, subtly sticky and deeply satisfying. A small pinch of flaky sea salt scattered over the top immediately after glazing brings out every layer of flavour.
Milk Bread Style Dinner Rolls Softer, Asian Inspired Dough
Milk bread dinner rolls produce the softest, most pillowy texture of any variation here, a style rooted in Japanese and broader East Asian baking traditions that has become genuinely beloved worldwide for good reason. The key difference is the use of a tangzhong, which is a simple cooked flour and milk paste made by whisking one tablespoon of flour with five tablespoons of milk in a small saucepan over low heat until it thickens to a pudding like consistency.
This paste is cooled and added to the dough during mixing and it is responsible for the extraordinarily tender, almost cloud like crumb that milk bread is known for. The tangzhong gelatinises the starch in the flour, allowing the dough to absorb and retain significantly more moisture without becoming wet or difficult to handle. The result is a dinner roll that stays soft for longer than any standard enriched dough and has a fine, even crumb that pulls apart in satisfying, cottony layers. If you enjoy baking recipes that push texture to its limits, our Fluffy Keto Bagels are another recipe worth trying for a completely different but equally rewarding bake.
Sweet Potato Dinner Rolls
Sweet potato dinner rolls are naturally moist, gently sweet and have a warm golden colour baked right into the dough, no food colouring, no artificial flavour, just the natural depth that cooked sweet potato brings to an enriched bread dough. To make these, cook and mash one medium sweet potato until fully smooth with no lumps, then allow it to cool to room temperature before adding it to the dough. Use approximately 120 grams of mashed sweet potato per standard batch and reduce the liquid in the recipe slightly, start by cutting the milk or water by two tablespoons, because sweet potato adds moisture of its own and the dough can become too slack if you do not adjust.
The potato also adds a subtle earthiness that balances the sweetness of the dough beautifully and the rolls bake up with a slightly denser but still very tender crumb that holds its shape well even after cooling. These pair particularly well with savoury mains and are a wonderful addition to a holiday table where you want something a little more interesting than a standard white roll. If you are building a full spread and need something for dessert, our collection of Easy Cake Recipes has plenty of simple, crowd pleasing options to round out the menu.
How to Store, Freeze and Reheat Dinner Rolls
Homemade dinner rolls store, freeze and reheat beautifully, making them just as practical for meal prep and leftovers as they are impressive fresh from the oven.
One of the best things about this dinner rolls recipe is that the effort you put in once pays off across multiple meals. Whether you are planning ahead, dealing with a batch that outlasted dinner, or looking for creative ways to use leftover dinner rolls the next day, the guidance below covers every scenario so nothing goes to waste.
How to Store Homemade Dinner Rolls Room Temp vs Fridge
Homemade dinner rolls store best at room temperature rather than in the fridge and understanding why makes it easier to keep them tasting freshly baked for as long as possible. Refrigeration actually accelerates staling in bread. The cold temperature yields the starch molecules in the crumb to recrystallise faster than they would at room temperature, which is why refrigerated rolls often feel dry and slightly rubbery even after just one day.
Unless your kitchen is very warm and humid, conditions that can encourage mould, always store dinner rolls at room temperature. Place them in an airtight container or wrap them tightly in cling film or a clean kitchen towel to keep the surface from drying out. Stored this way, they stay soft and pleasant for two to three days.
If your kitchen is particularly warm or you live in a humid climate, refrigeration becomes necessary to prevent spoilage, but plan to reheat the rolls before eating rather than consuming them cold. Cold rolls straight from the fridge will always feel denser and less enjoyable than the same roll warmed through for a few minutes.
How to Freeze Dinner Roll Dough Before Baking
Freezing the dough before baking is one of the most useful techniques in a home baker toolkit. It means you can mix and shape a full batch now and bake fresh rolls on demand for weeks afterwards.
After the first proof, punch the dough down and shape it into individual rolls as you normally would. Place the shaped rolls on a lined baking tray and freeze them uncovered for one to two hours until they are solid, then transfer them to a zip lock freezer bag or an airtight container. This flash freezing step prevents the rolls from sticking together in storage. They will keep in the freezer for up to six weeks without any significant loss of quality.
When you are ready to bake, remove the rolls from the freezer the night before and place them in a lightly greased baking tin, spaced as you would for a normal second proof. Cover loosely and leave them in the fridge overnight to thaw slowly. The next morning, bring them to room temperature for about thirty to forty five minutes, allow them to complete their second rise if they have not already puffed up, then bake as normal. The result is genuinely fresh tasting rolls with no compromise on texture.
Alternatively, you can freeze the rolls after baking, once they have cooled completely. Wrap them each in cling film and place them in a freezer bag. They will keep for up to three months and reheat from frozen in just ten to twelve minutes in a moderate oven.
Best Ways to Reheat Dinner Rolls Without Drying Them Out
The biggest mistake people make when reheating dinner rolls is using dry heat without any moisture protection, which turns a soft roll into something closer to a bread roll from a roadside café, dry on the outside, tough in the middle.
The oven is the best reheating method for preserving quality. Preheat to 160°C (320°F), wrap the rolls loosely in foil to trap steam and heat for eight to ten minutes. The foil creates a mini steam environment inside the parcel that rehydrates the crumb and softens the crust without making it soggy. For the last two minutes, open the foil to let the tops regain a little colour and light crispness if you prefer. Finish with a brush of melted butter the moment they come out, exactly as you did when they were freshly baked.
For a single roll, the microwave works in a pinch but requires a moisture trick to prevent the roll from becoming tough. Place the roll on a microwave safe plate, lay a damp paper towel loosely over the top and heat on medium power for twenty to thirty seconds. The damp towel produces just enough steam to keep the crumb soft. Do not overheat, thirty seconds is usually enough and extra time in the microwave makes the rolls rubbery rather than warm. If you enjoy soft, pillowy breads in general, our Soft Shawarma Wrap Bread is another recipe that reheats beautifully and pairs wonderfully with bold, flavourful fillings.
Creative Recipes Using Leftover Dinner Rolls
Leftover dinner rolls are far more useful than most people realise, they transform into entirely different dishes with almost no effort, making them one of the most versatile things you can have sitting on your counter the morning after a big meal.
The simplest option is to split a leftover roll, butter it generously and toast it cut side down in a dry frying pan over medium heat until deeply golden. The sugar in the dough caramelises against the hot surface and turns an ordinary leftover into something genuinely special. Serve it with jam, soft cheese, or a fried egg for a quick breakfast that takes less than five minutes.
For something more substantial, leftover dinner rolls make an outstanding bread pudding. Tear the rolls into rough chunks, arrange them in a baking dish,add over a custard mixture of eggs, milk, sugar and vanilla and bake until set and golden on top. The enriched dough absorbs the custard beautifully and produces a bread pudding with a richer, more tender texture than standard white bread would give. If you want to serve this as a proper dessert, our Pineapple Coconut Cake makes a wonderful companion on the same table, tropical, light and a perfect contrast to the warmth of a baked pudding.
Leftover rolls also work well as slider buns, mini sandwich bases, or torn and toasted into croutons for soups and salads. If they have become slightly stale, blitz them in a food processor to form fresh breadcrumbs, which keep in the freezer for up to three months and are endlessly useful for coating, topping and binding across dozens of recipes.
What to Serve With Dinner Rolls

The versatility of a good dinner rolls recipe is half the reason they’re worth mastering. They slot into almost any meal without much thought.
On the savory side Serve them alongside thick soups, braised meats, roasted chicken, mashed potatoes, or grilled vegetables. They’re particularly good at the holiday table, pull-apart rolls look impressive without requiring impressive effort.
For a lighter meal Split them and use them as sandwich rolls. They hold up to fillings without getting soggy, and their slight sweetness beautifully balances savory proteins.
On the sweeter side They are genuinely excellent at breakfast, slathered with butter and fruit preserves or honey.
A Note Before You Start Baking
Bread has a reputation for being difficult that it doesn’t entirely deserve. Yes, it requires patience. Yes, the yeast is a living thing and occasionally has opinions. But the fundamentals of a great dinner rolls recipe, good hydration, warm proofing conditions, and enough fat in the dough, are well within reach of any home kitchen, even on a weeknight. Start here. Get these rolls into your regular rotation.
Also, try our other delicious recipe:
Frequently Asked Questions (FAQs)
What Is the Secret to Soft Dinner Rolls?
The secret to soft dinner rolls is fat in the dough, full proofing on both rises and a generous brush of melted butter the moment the rolls leave the oven. These three things together keep the crumb tender, the structure airy and the exterior soft rather than dry or tough.
Can I Make Dinner Rolls Without a Mixer?
Yes, this recipe is designed as a one bowl, no mixer method. Simply mix by hand until a dough forms, then knead on a floured surface for eight to ten minutes until smooth and elastic. A stand mixer speeds things up, but it is not necessary for a great result.
How Long Do Homemade Dinner Rolls Last?
Homemade dinner rolls stay soft and fresh for two to three days stored in an airtight container at room temperature. For longer storage, freeze them for up to three months and reheat straight from frozen in a foil parcel at 160°C for ten to twelve minutes.
Can I Make Dinner Rolls Without Yeast?
Yes, baking powder or baking soda can replace yeast for a quicker no proof version, though the texture will be tighter and more biscuit like rather than soft and pull apart. If time allows, yeast always produces the superior result in both texture and flavour.
Why Did not My Dinner Rolls Rise?
The most common reasons are expired yeast, liquid that was too hot and killed the yeast, or a kitchen that was too cold for the dough to proof properly. Always check your yeast expiry date and use warm liquid between 35°C and 43°C for a reliable rise every time.
Can I Bake Dinner Rolls in an Air Fryer?
Yes, but the air fryer produces a crispier, darker exterior and limits the rise compared to oven baking. The oven remains the best method for achieving the soft, fluffy, pull apart texture this recipe is built around.
Are These Dinner Rolls American Style or Continental?
These are American style dinner rolls, enriched with butter and sugar, oven baked until golden and finished with a butter glaze for a soft, lightly sweet result. They sit within the broader Continental tradition of enriched bread but are distinctly softer and sweeter than leaner European style rolls.


1 Comment. Leave new
These soft sweet dinner rolls look absolutely delicious! 😍 I love how fluffy and golden they turned out. The one-bowl method makes the recipe feel so approachable, even for beginner bakers. Thanks for sharing such a simple and comforting homemade bread recipeI can’t wait to try it myself! 🍞✨