This red velvet cake recipe makes two soft, tender 10 inch layers with a subtle cocoa flavor, filled and lightly coated in tangy cream cheese icing. This homemade red velvet cake has a fine, moist crumb that slices cleanly and shows its red layers through a thin, naked style finish. Serving 12 to 16, it works as a birthday centerpiece or a holiday showstopper without needing any special decorating skills. Looking for more bakes to follow it? Browse our full collection of Dessert Recipes.
What Is Red Velvet Cake?
Red velvet cake is a soft, tender layer cake with a mild cocoa flavor, a slight buttermilk tang and a deep red color, traditionally finished with cream cheese frosting. It sits somewhere between vanilla and chocolate cake. It is richer than the first and much lighter than the second. The “velvet” in the name refers to the fine, plush crumb that comes from buttermilk, oil or butter and a small amount of acid working on the flour.
The red color has a practical history. Cocoa naturally contains pigments that turn reddish when they meet acidic ingredients like buttermilk and vinegar, which gave early versions of the cake a rusty, reddish brown tint. Modern bakers add red food coloring for the vivid shade people expect today. The color is largely cosmetic, because a typical recipe uses only one to two tablespoons of cocoa powder. That small amount is why the cake never tastes like a full chocolate cake.
What Does Red Velvet Cake Taste Like?
Red velvet cake tastes mildly sweet and creamy, with a gentle chocolate note and a light tang that keeps it from feeling heavy. The first impression is usually the texture. The crumb is moist, fine and almost springy and it softens further against the frosting. Each bite carries a little richness from the cocoa and a clean, slightly tart finish from the buttermilk, balanced by the sweet, tangy cream cheese frosting.
If you have only had chocolate cake, expect something less intense and more delicate. Many people describe the experience as a vanilla cake with a hint of chocolate, which is close to accurate.
What Flavor Is Red Velvet?
Red velvet’s flavor blends subtle cocoa, buttermilk tang and vanilla, with no single note dominating. The cocoa is a background flavor, the buttermilk adds a soft sourness similar to a mild yogurt and the vanilla rounds everything out and keeps the cake from tasting flat. The color itself has no flavor. Good red velvet cake relies on this balance rather than on food coloring and the cream cheese frosting is part of it, adding a sharper tang that lifts the whole slice.
Making Delicious Red Velvet Cake Recipe
Ingredients
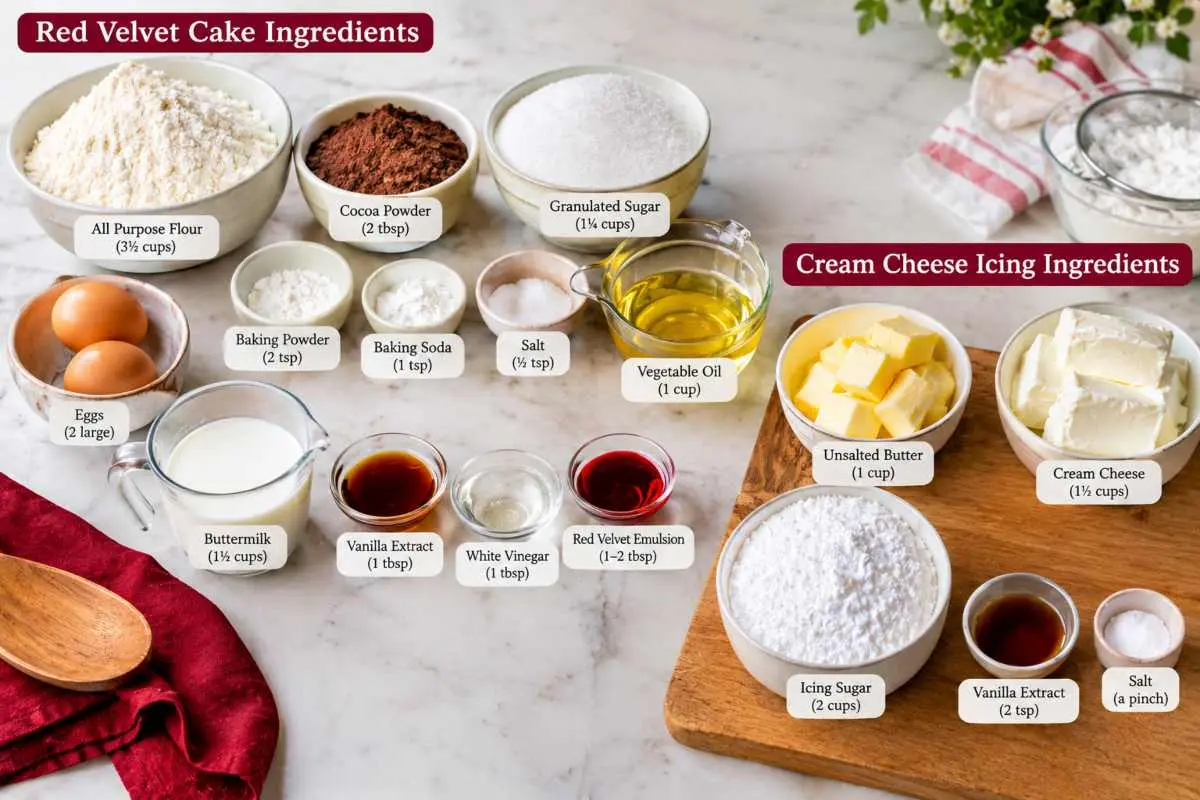
For the Red Velvet Cake
- 3½ cups (438 g) all purpose flour
- 2 tablespoons unsweetened cocoa powder
- 2 teaspoons baking powder
- 1 teaspoon baking soda
- ½ teaspoon salt
- 1¼ cups (250 g) granulated sugar
- 1 cup (240 ml) vegetable oil
- 2 large eggs, at room temperature
- 1½ cups (360 ml) buttermilk, at room temperature
- 1 tablespoon vanilla extract
- 1 tablespoon white vinegar
- 1–2 tablespoons red velvet emulsion, depending on the desired color
For the Cream Cheese Icing
Enough for the filling and a thin naked style coating.
- 1 cup (227 g) unsalted butter, softened
- 1½ cups (340 g) full fat cream cheese, softened but still cool
- 2 cups (240 g) icing sugar, sifted
- 2 teaspoons vanilla extract
- A pinch of salt
Instructions
- Prepare the Cake Pans Preheat the oven to 350°F (175°C). Grease two 10 inch round cake pans and line the bottoms with parchment paper.
- Mix the Dry Ingredients In a large bowl, whisk together flour, cocoa powder, baking powder, baking soda and salt.
- Combine the Wet Ingredients In a bowl, whisk sugar and the oil until combined. Add the eggs and whisk well. Mix in the buttermilk, vanilla extract, vinegar and red velvet emulsion.
- Combine the Batter Add the dry ingredients to the wet mixture, stirring gently until just combined. Avoid overmixing. The batter should be smooth and fairly loose.
- Bake the Cake Divide the batter evenly between the prepared pans. Bake for 25–35 minutes or unless a toothpick put in in center of cake come out with a few crumbs.
- Let the cakes to cool in pans for about 10–15 minutes before shifting them onto a wire rack to cool fully.
- Wrap the cooled cakes and refrigerate for at least 1 hour before decorating for easier handling.
- Prepare the Cream Cheese Icing Beat the softened butter until smooth and creamy. Add cream cheese and beat shortly until combined. Add sifted icing sugar then mix in vanilla extract and salt. Avoid overbeating, as cream cheese icing can become too soft. Refrigerate for 20–30 minutes if needed.
- Assemble the Naked Red Velvet Cake Spread a small layer of icing on the board to help hold the cake in placd. Place the first cake layer on a cake board or serving plate. Add a layer of cream cheese icing over the top.
- Place the second cake layer on top. Spread a light layer of icing over the top and sides of the cake.
- Use a cake scraper or offset spatula to smooth the icing, leaving some of the red cake visible for the naked style finish.
- Refrigerate for at least 30 minutes before serving.
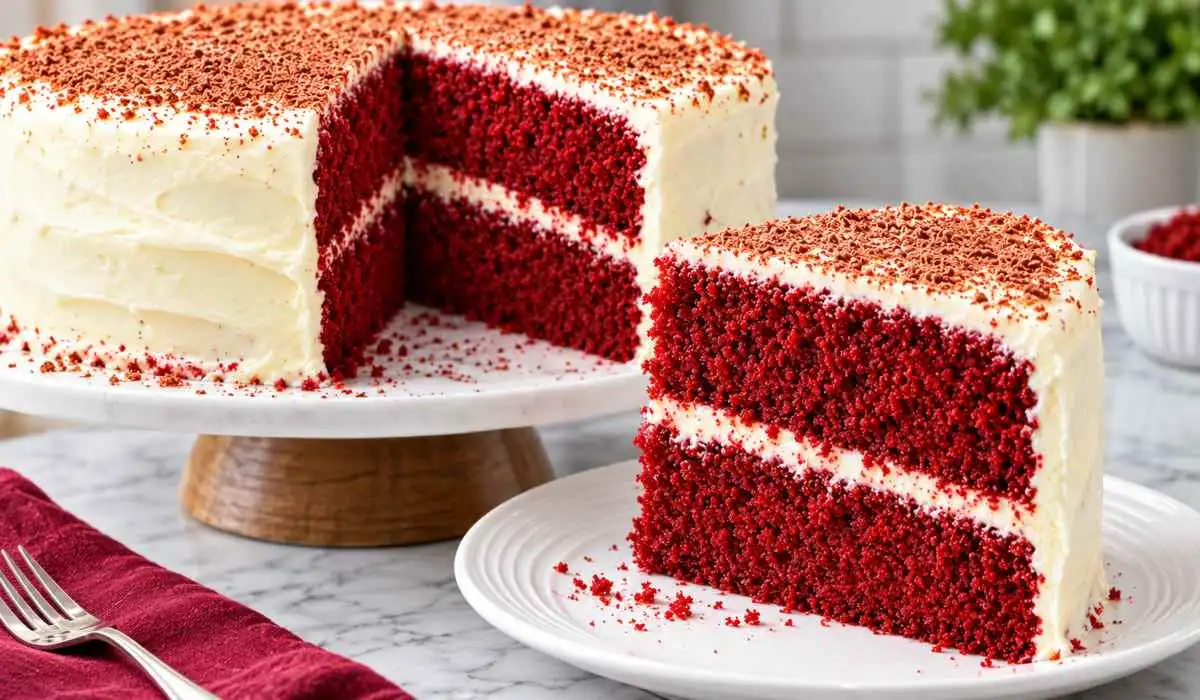
Moist Red Velvet Cake with Cream Cheese Icing
Ingredients
For the Red Velvet Cake
- 3½ cups 438 g all purpose flour
- 2 tablespoons unsweetened cocoa powder
- 2 teaspoons baking powder
- 1 teaspoon baking soda
- ½ teaspoon salt
- 1¼ cups 250 g granulated sugar
- 1 cup 240 ml vegetable oil
- 2 large eggs at room temperature
- 1½ cups 360 ml buttermilk, at room temperature
- 1 tablespoon vanilla extract
- 1 tablespoon white vinegar
- 1–2 tablespoons red velvet emulsion depending on the desired color
For the Cream Cheese Icing
- Enough for the filling and a thin naked style coating.
- 1 cup 227 g unsalted butter, softened
- 1½ cups 340 g full fat cream cheese, softened but still cool
- 2 cups 240 g icing sugar, sifted
- 2 teaspoons vanilla extract
- A pinch of salt
Instructions
- Prepare the Cake Pans Preheat the oven to 350°F (175°C). Grease two 10 inch round cake pans and line the bottoms with parchment paper.
- Mix the Dry Ingredients In a large bowl, whisk together flour, cocoa powder, baking powder, baking soda and salt.
- Combine the Wet Ingredients In a bowl, whisk sugar and the oil until combined. Add the eggs and whisk well. Mix in the buttermilk, vanilla extract, vinegar and red velvet emulsion.
- Combine the Batter Add the dry ingredients to the wet mixture, stirring gently until just combined. Avoid overmixing. The batter should be smooth and fairly loose.
- Bake the Cake Divide the batter evenly between the prepared pans. Bake for 25–35 minutes or unless a toothpick put in in center of cake come out with a few crumbs.
- Let the cakes to cool in pans for about 10–15 minutes before shifting them onto a wire rack to cool fully.
- Wrap the cooled cakes and refrigerate for at least 1 hour before decorating for easier handling.
- Prepare the Cream Cheese Icing Beat the softened butter until smooth and creamy. Add cream cheese and beat shortly until combined. Add sifted icing sugar then mix in vanilla extract and salt. Avoid overbeating, as cream cheese icing can become too soft. Refrigerate for 20–30 minutes if needed.
- Assemble the Naked Red Velvet Cake Spread a small layer of icing on the board to help hold the cake in placd. Place the first cake layer on a cake board or serving plate. Add a layer of cream cheese icing over the top.
- Place the second cake layer on top. Spread a light layer of icing over the top and sides of the cake.
- Use a cake scraper or offset spatula to smooth the icing, leaving some of the red cake visible for the naked style finish.
- Refrigerate for at least 30 minutes before serving.
Notes
Please note that the nutritional information is a rough estimate and can vary significantly based on the products used in the recipe.
Nutrition
Tips for the Best Moist Red Velvet Cake
The best moist red velvet cake comes down to four habits, using room temperature dairy and eggs, measuring flour by weight, mixing and baking only as long as needed and keeping the cream cheese icing cold. Each one protects the soft, plush crumb that gives this cake its name.
Room Temperature Eggs and Buttermilk
Eggs and buttermilk that have sat out for about 30 minutes blend into the batter smoothly and produce a more even, tender crumb. Cold ingredients cause the fat in the batter to firm up and separate, which leaves small dense patches and a cake that bakes unevenly. Because red velvet relies on buttermilk for both its tang and its softness, even a slightly chilled batter can change the texture. If you forget to set things out, place the whole eggs in a bowl of warm tap water for five minutes and let the buttermilk stand on the counter while you measure the dry ingredients.
Measuring Flour Accurately
Weigh your flour or spoon it into measuring cup and level it off, because scooping straight from the bag packs in too much. A cup of flour is generally treated as about 120 grams, yet a packed scoop can weigh 20 percent more and that extra flour is one of the most common reasons a red velvet cake turns out dry. A kitchen scale removes the guesswork entirely and makes the result repeatable from one bake to the next. If you use cups, fluff the flour with a spoon first, pile it in lightly and sweep the top flat with a knife.
Avoiding Overmixing and Overbaking
Mix the batter only unless the flour fades and take the cakes out of the oven as soon as they test done. Stirring too long develops gluten, which makes the crumb tough and rubbery instead of velvety, so combine wet and dry ingredients in alternating additions and stop as soon as the streaks are gone. Baking is just as important. Layers at 350°F usually need 25 to 30 minutes and they are ready when a toothpick Show up with a few moist crumbs attached or the center reaches roughly 205°F to 210°F. Pulling the pans a minute early is safer than a minute late, since the cakes keep setting as they cool.
Keeping the Icing Chilled
Cream cheese icing should stay cool and firm while you work, because warm icing turns runny, slides off the layers and soaks into the crumb. Use cream cheese and butter that are softened but still slightly cool, beat them only until smooth and refrigerate the icing for 15 to 20 minutes if it loosens. Let the cake layers cool fully before frosting, then chill the assembled cake for 30 minutes so the icing sets and the slices cut cleanly. Store finished cake in refrigerator and bring a slice to room temperature before serving, which restores the soft texture and full flavor.
Why Is Red Velvet Cake Red?
Red velvet cake is red because of added red coloring, usually helped along by a small amount of cocoa reacting with acidic ingredients like buttermilk and vinegar. The cocoa and acid create a faint reddish brown tint on their own, but the bright ruby shade in most bakeries and kitchens comes from food coloring or a red velvet emulsion. Without any color added, the cake bakes up closer to a soft mahogany brown.
The Role of Red Velvet Emulsion
A red velvet emulsion is a concentrated, water based blend of red coloring and cake style flavor and 1 to 2 tablespoons is generally enough to give a standard two layer cake a rich red color. It works differently from a plain liquid dye because it carries a hint of vanilla and buttery sweetness along with the pigment, so it deepens the color while supporting the flavor. Its concentration also means you need less of it than you would of a thin liquid coloring, which helps protect the batter’s texture and keeps the cake from tasting bitter or chemical.
Stir the emulsion into the wet ingredients before the flour goes in, so the color spreads evenly without extra mixing. Start with 1 tablespoon for a deep rosy red and move toward 2 tablespoons for a bolder, bakery style shade. Because the color is built into the batter rather than painted on, every slice shows the same shade from edge to center.
How to Adjust the Color
Adjust the shade by changing the amount of emulsion in small steps and remember that the batter always looks a little brighter than the finished cake. Heat softens red pigment during baking and the cocoa tones it down further, so a batter that looks vivid and slightly intense will usually bake into the right color. If you want a brighter, more vibrant cake, add emulsion a half tablespoon at a time up to the 2 tablespoon mark, mixing briefly after each addition.
Cocoa also shapes the final shade. Natural cocoa reacts with buttermilk and brings out warmer red tones, while Dutch process cocoa is darker and pushes the cake toward brown. If your cake bakes up too brown, use slightly less cocoa or switch to natural cocoa. If it turns out too pink or orange, a teaspoon more cocoa deepens it. For a naturally colored version, beet powder gives a reddish hue, though the shade is softer and less consistent than emulsion or gel coloring.
Is Red Velvet Cake Just Chocolate Cake?
No, red velvet cake is not only a chocolate cake. It is its own style of cake, with only a trace of cocoa, a tangy buttermilk base and a soft, fine crumb. A chocolate cake tastes primarily of chocolate, while red velvet tastes more like a tender vanilla buttermilk cake with a faint cocoa note.
Red Velvet vs Chocolate Cake
The main difference is how much cocoa each cake uses and what that cocoa is meant to do. A red velvet recipe usually calls for just 2 tablespoons of cocoa powder, which adds a subtle, rounded flavor rather than a deep chocolate taste. A standard chocolate cake often uses a half cup or more, which is why it tastes bold, dark and rich by comparison.
The supporting ingredients also set them apart. Red velvet relies on buttermilk and a splash of vinegar and the acid softens the gluten in the flour and gives the crumb its plush, velvety texture. The acid also adds a gentle tang that chocolate cake does not have. Chocolate cake leans on the cocoa itself for flavor and often uses coffee or hot water to intensify it.
Finishing is the last big difference. Red velvet is normally topped with cream cheese frosting, whose tang echoes the buttermilk in the cake. Chocolate cake usually pairs with chocolate buttercream or ganache, which doubles down on the cocoa.
Does Red Velvet Have Chocolate?
Red velvet cake has a little chocolate, but only in the form of a small amount of cocoa powder, not melted chocolate or chocolate chips. The cocoa gives the cake a slight depth and contributes to its color when it reacts with the buttermilk and vinegar, yet it is a background flavor. Most people taste vanilla, buttermilk and cream cheese before they notice any chocolate. If you want to enjoy a strong chocolate flavor, you can increase the cocoa slightly, but too much will push the cake toward chocolate cake and soften the tang that defines red velvet.
Cream Cheese Icing for Red Velvet Cake
Cream cheese icing is the classic choice for red velvet cake and a standard batch made with 8 ounces of cream cheese, about 1/2 cup of butter and 3 to 4 cups of powdered sugar is enough to fill and frost a two layer 8 inch cake. Its creamy tang echoes the buttermilk in the crumb and keeps the cake from tasting overly sweet.
What Icing Goes on Red Velvet Cake?
Cream cheese icing is the traditional topping for red velvet cake, with vanilla buttercream and ermine icing as the most common alternatives. Cream cheese icing is the best match because its slight sourness complements the cake’s cocoa and buttermilk notes, while its smooth, spreadable texture suits the soft crumb. Some vanilla extract and a little salt round out the flavor and cut through the sweetness.
Ermine icing, also called boiled milk frosting, is the old fashioned pairing. It is cooked from flour, milk, sugar and butter, so it tastes lightly sweet and whipped and it holds up better in warm weather than cream cheese icing does. Vanilla buttercream is the sweeter, sturdier option for decorating, though it lacks the tang that makes red velvet distinctive. For the most authentic flavor, use full fat block cream cheese rather than the spreadable tub kind, which contains more moisture and produces a soft icing that struggles to hold its shape.
Naked Style Finish with a Thin Coating
A naked style finish means spreading a thin, translucent layer of icing over the outside of the cake so the red crumb shows through. It highlights the cake’s color and uses far less icing than a fully frosted version. The result looks rustic and modern at once and it suits red velvet well because the bright crumb is the main attraction.
Start by placing the chilled, fully cooled cake on a turntable if you have one. Spread an even layer of icing over the top and sides, then drag a bench scraper or the flat edge of a knife around the cake while turning it, scraping back until the red layers peek through. A few visible patches of crumb are part of the look, so there is no need to make the coating perfect. Finish the top with a swirl of leftover icing, fresh berries or a dusting of red velvet crumbs, then chill briefly to set the coating before slicing.
Storage
Red velvet cake should be stored in the refrigerator because its cream cheese icing is perishable. Food safety guidance says dairy based frosting should not sit at room temperature for more than about two hours and a covered cake keeps well in the fridge for up to 4 to 5 days.
Store the Cake in the Refrigerator
Keep a frosted red velvet cake in the refrigerator, covered, so the cream cheese icing stays safe and the crumb stays moist. Once the icing has been chilled for 20 to 30 minutes and is firm to the touch, place the cake in an airtight container or under a tall cake dome. If you are storing it with part of the cake already cut, press a piece of plastic wrap gently against the exposed crumb or press a slice of parchment over the cut edge, to prevent it from drying out.
Refrigerator air carries strong odors and butter and cream cheese absorb them easily, so keep the cake away from onions, garlic and leftover savory dishes. For longer storage, freeze unfrosted layers wrapped it tightly in plastic and a foil for up to 3 months and thaw them overnight in fridge before frosting. You can also freeze a fully frosted cake, though the icing texture is best when the cake is chilled solid first and thawed slowly.
Chilling Before Serving
Take the cake out of the refrigerator about 30 minutes before serving, which lets the crumb soften and the flavors open up. Straight from the fridge, the butter in the cake is firm, so the texture feels denser and the cocoa and vanilla taste muted. After a short rest at room temperature, the crumb turns plush again and the cream cheese icing becomes creamy instead of stiff.
For clean slices, though, cold is your friend. Cut the cake while it is still well chilled, using a long, sharp knife wiped clean between cuts, then let the individual slices warm up on the plate. This gives you neat layers with the icing intact and each serving still tastes soft and fresh by the time it reaches the table.
Conclusion
Red velvet cake is a tender, tangy, lightly cocoa flavored cake whose signature look and texture come from a few small details, about 2 tablespoons of cocoa, buttermilk and vinegar for softness, a red emulsion for color and cold cream cheese icing to finish. Get those basics right, weigh your flour, mix gently and pull the layers from the oven on time and you will have a moist, velvety cake every time. Keep it covered in the refrigerator, where it stays fresh for almost 4 to 5 days and let a slice rest for about 30 minutes before serving for the softest crumb and fullest flavor. For more easy, reliable baking ideas, explore the recipes at Devine Dishes.
Also try our other delicious cake recipes:
Frequently Asked Questions (FAQs)
What flavor is red velvet cake?
Red velvet cake has a mild flavor made of subtle cocoa, a light buttermilk tang and vanilla. It tastes like a soft vanilla cake with a hint of chocolate, topped by tangy cream cheese icing.
Is red velvet cake chocolate cake?
No, red velvet is not chocolate cake. It uses only about 2 tablespoons of cocoa, so the chocolate flavor stays in the background, while buttermilk and vinegar give it a tangy, tender crumb.
What makes red velvet cake red?
Red food color or a red velvet emulsion gives the cake its bright color. Cocoa reacting with buttermilk and vinegar adds a faint reddish tint, but on its own the cake bakes up brownish.
What is red velvet cake made of?
Red velvet cake is made of flour, sugar, a little cocoa powder, buttermilk, eggs, oil or butter, vinegar, vanilla and red coloring. Buttermilk and vinegar create its soft, velvety texture.
What icing goes on red velvet cake?
Cream cheese icing is the classic choice because its tang complements the cocoa and buttermilk. Ermine icing and vanilla buttercream are common alternatives.
How do you make red velvet cake moist?
Use room temperature eggs and buttermilk, weigh your flour and mix until the batter is combined. Pull the layers from the oven as soon as a toothpick comes out with some moist crumbs.
Why store red velvet cake in the fridge?
The cream cheese icing is dairy based and perishable, so refrigeration keeps the cake safe and fresh for 4 to 5 days. Let slices sit at room temperature for about 30 minutes before serving to soften the crumb.